La sfarsitul acestui ghid ar trebui să fiti capabili de a crea acest lucru şi sa invatati multe trucuri pentru cariera dvs. de webdesign ,sau pentru a va face un layout la forumul vostru!
 Step 1
 Firstly we need a document, create something like 780x700, this is so if you do decide to slice and code then it will fit the most used resolutions and won't need to backtrack later, fill the background in and move on to step two.
Step 2 Now, I've used the gradient tool to create a black fading area at the top of my background, this just adds depth to the layout and eliminates those boring one colour backgrounds, I then set the layer to overlay.
Step 3 Now we'll start the actual layout, created a vertical rectangle from top to bottom, try to leave a gap on the left and right, fill it with a colour, this will just be a working area, where we'll place everything later, see my image below to see what i've done so far.
 Step 4
 Now i've added a drop shadow to the previously made shape, this is to make the sides look like they slowly end, instead of just stopping, this is a widely used technique, other ways of doing this is created some sort of side images, like bars ect.
Now let's add something to the top, I find working from the top down much more easy than any other way, draw a rectangle about 30px height from left to right in the shape we created as a guide, I left a few pixels from the top, left and right, now use gradient overlay to make a shine in the top bar, we can use this for links or something later.
 Optional
: Add a inner shadow and change the inner shadow to 'Opacity 40%', this will add a slight 3D type of shape into the top.
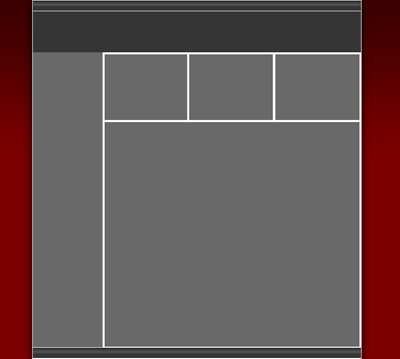
Step 5 For this next step we won't be doing anything to advanced, I've simply created my 'Layout' I want, by just creating simple shapes where i want my canvas, content and such information, I also duplicated the top bar and moved it to the bottom where Privacy/copyright will go.
 Step 6
 First we'll do the left hand navigation, select that shape we created with the magic wand tool, now create a new layer and go to 'Select > Modify > Contract', now contract it about 5pixels, now fill the shape, again get the rectangle marquee tool and on the same layer, select the bottom till about 3/4 to the top, 'Right click > Select > Feather' this will create this nice fading part of the navigation, you can add some blending options, mostly you should use the inner shadow to make the navigation look indented into the layout, a slightly 3D look.
 Step 7
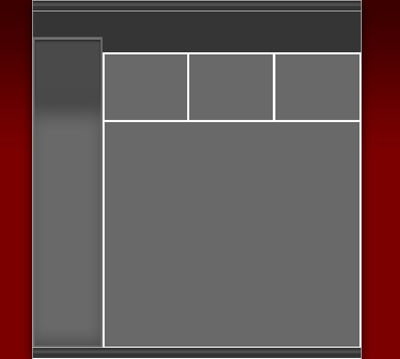
 Here we will improve the navigation look quite a bit, select the first shape for the navigation we create with the magic wand, now create another layer and use a pattern to fill it(Paint bucket tool > Change foreground to pattern, found at the top left), something like this:

Now using the technique to blend this in will be the same as last time but the reverse, this time feather the top and then turn the opacity down until you see fit, create yet another layer and get the gradient tool, create yet another square with the rectangle tool, right at the top and select the white colour and use 'foreground to transparent', now drag from the top left of the square to about half way, now set the opacity down until you see fit, you should have something like this.
 Step 8
 Now we'll start with the middle 3 boxes, we'll do one and then just duplicated it over, select the first square which you created a few steps back and 'Select > Modify > Contract' by 4pixels, fill this with a slightly darker colour and use blending options, 'Inner Shadow', this will again make it look further back, thus giving it a 3D look, now create another layer and use the same size for this, use the pattern tool again and turn the opacity down, now if you like the shiny effect on the navigation you can create this for these 3 boxes, if so just do the same as the end of step 7.
 Step 9
 The next part will be the main content area, for news and pages, select the content shape we created way way way at the start and contact(Select > Contract > Modify) it by 4pixels, create a new layer and now fill it with the same slightly darker colour you used before, add a little inner shadow for a little eye candy.
Here we will create a bar, which could contain, page name, news id, news title and so on, create a rectangle with about 16 height, draw this from left to right inside the content area be about 4 px from each side, left, top and right, fill this with an even darker colour, put a slight inner shadow inside this shape and if you like, a shine, do not make it feel empty, it could pull the whole template down! Next add a 'Stroke > 1px > white > inside', turn the opacity down until it fits nicely with the rest of the layout.
Here's mine so far;
 Step 10
 Now we'll create the final content area, this will be where the content will actually go! Create the size needed, about 4px below the bar we created, this should also be 4px from left, right and bottom, this will make all sides equal and won't draw attention, here's the blending options i used, there's quite a few, play around if you do not want the same effect!
Inner Shadow  Gradient Overlay
  Stroke
Here's what this should look like, if you have any ideas you think you could do then implement them, maybe a shine/pattern.
 Step 11 - Final
 All that's left is the banner, there's hundreds of styles to suit whatever you like, for mine i will just create something simple for the layout, so you can see it as a whole, I will also fill in some example text so you can see what the template looks completely finished.
Without Text:  With Text:
 Thanks for reading, hopefully you've learnt a lot!
Remember to [URL="http://www.evogfx.com/register.php"]register[/URL] on the forums for future tutorials and to get support for anything photoshop related!


