Ah, the elusive Pen Tool. The Pen Tool in Photoshop, much like in Illustrator is used to make Vector points. When you are working with a Vector image, you are working with lines and points as opposed to Raster where you are working with pixels. Working with Vector images gives you a much cleaner design. In Photoshop, the Pen Tool as many functions. You can use it make selections with to delete or extract areas or use it to create Vector style designs in Photoshop. Today, I'm going to teach you how to use it create a slow shutter writing effect as if you were writing in the air with a flashlight, sparkler, etc.
Step 1First off, lets create a new document. I started out with a document 400 pixels x 225 pixels at 72 dpi. Fill the background with a gradient if you like. I used black and a dark purple (#53148D) for the background. Feel free to use what you like. After that, select the Pen Tool

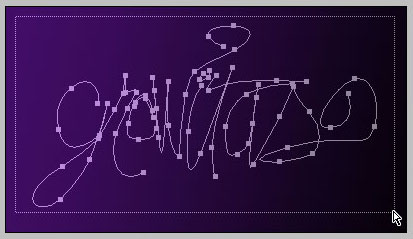
("P"). Think of an awesome word. It could be your name, but I chose the word "Gravitas" because I really like to say that word. Gravitas. (Gravitas - seriousness or sobriety, as of conduct or speech; dictionary.com)
Start using your Pen Tool to write out the word. Before you begin, you need to set your Pen Tool to work as Paths instead of Shapes. Once you select the Pen under the "File" bar, you'll see two icons that look like this

Make sure that you have Paths selected. It is the same icon that I have selected in the image. Now, you can start writing out your word. Don't worry about it looking smooth. We will clean up the path in the next step. Once your word is written out, it should look somewhat like this...

You'll notice that I mine isn't one continuous path. This is actually easy to do. When you get to a point where you want to stop, hit A on your keyboard and click anywhere on the art board. Then when you are ready to begin again, hit P and start again.
Step 2Now that we have something roughed out, we can go in and clean it up. We will be using the Direct Selection Tool" ("A") and the various Pen Tool options. Hit A to select the Direct Selection Tool. With this tool, you can select Vector points to move around. Also if the point is on a curve, the Direct Select Tool will allow you to adjust the curve. You'll see small handles stick out of the point and adjusting those handles will change how much curve you got. If it is a Vector point that is not on a curve, it will allow to move the point around.


The other tool to use to edit your path is the Pen Tool. Click and hold the Pen Tool icon in the toolbar and a box will pop up with a whole other menu of tools. The ones that you will need from here are the Delete Anchor Point

& the Convert Point tool

The Delete Anchor Point tool is pretty self explanatory. Sometime when working with "Vector" paths, the old adage, less is more, is a good way to think. In this case, it certainly is. You'll notice the less points you have, the easier it is to have smooth looking curves. The other tool that you will use a lot is the Convert Point" tool. This is a wicked handy tool. If you have it selected and you move your cursor over a point, the cursor changes to this
. When you click on a point, it will change.


Once you click on the point, hold the mouse button down and you will see handles appear. This will help you in smoothing things out. The way cleaning up your path breaks down is like this, the longer you spend on it, the cleaner it will look. So take your time it you must.

 Step 3
Now that you have your path the way that you want it, now it's time to make it stand out. Using your Direct Select Tool" ("A"), click and drag it across your path. All of your points need to be selected. Now, create a new layer. Make sure that you still have your path selected and choose your Brush tool ("B"). Right click anywhere on the image to bring up the brushes palette. We want to select a hard edge brush, with at least at thickness of 5px no smaller than 3px.

A brush is now selected. Choose your Pen Tool ("P"). With the Pen Tool right click on the image. (You still need to have your path selected.) A dialog will will pop up with a very options, choose Stroke Path.


Now the stroke path box is up. Select Brush from the tool field and make sure that you check the Simulate Pressure option. This will give the edges a nice tapered affect. Click ok. Pretty cool. Bet that you didn't know you could do that. Unfortunately, the path is covering up what we need, so we need to delete it. Select the Pen Tool again ("P"), right click and select Delete Path.

Now, here is what we got.
 Step 4
First off, lets go ahead and make a duplicate of the layer, CTRL+J (win) / COMMAND+J (mac), and place it underneath the orginial layer.
It's time now to make this bad boy shine. We'll start by using a layer effect, Outer Glow. Select the top original layer to apply the settings to . Here are the settings that I used, but feel free to try something else out.


Alright so now we got some glow going on. Next, we are going to add a little bit of movement behind our glowing layer. Select the copy that we just made at should be below the original layer. Filter > Blur > Radial Blur


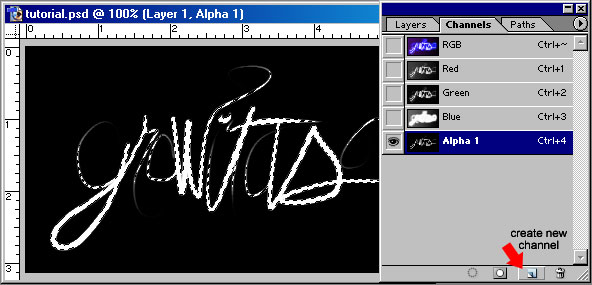
Hold down the CTRL key and click on the original Layer 1 in the layers palette. This will make the contents of the layer a selection.

Now we are going to create a new Channel layer. In the layers palette beside the layers tab, is a tab called Channels", select that. You see a RGB, Red, Green, & Blue channels. At the bottom is an icon just like the create new layer icon, click it, and you will create "Alpha 1" channel. Now fill your selection with white.
Use CTRL+D (win) / COMMAND+D (mac), to deselect the image. Filter > Pixelate > Color Halftone This filter will make our image in black & white halftone, basically just cutting a bunch of circles out. Here are my settings.


Alright this is what we need. As before, hold down your CTRL/COMMAND key and click on the Alpha 1 channel that you just created. Click on the Layers tab and create a new layer, which will be named "Layer 2" and place it just above the background. To top it off, fill it with white.
 Step 5
Now it's time to add some layer effects to our new layer we just created. Also change the layer style to Overlay.


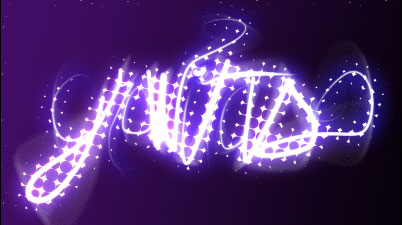
Next lets us another Radial Blur filter. This time set it to Zoom not Spin. Here are the settings that I used.


Use CTRL+F (win) / COMMAND+F (mac) to reapply the filter. It is a little overbearing so turn the layer's Opacity down to 55%. So there you are. Now do with it what you please. I found a cool brush and add a few extras to Layer 2. Play around and see what you can come up with. The possibilities are endless.

Source: [URL="http://www.photoshopdigest.com/text-effects/slow-shutter-style-light-text/"]Photo Digest[/URL]


 :X
:X